[Excel] I want to add header and footer when printing!In Excel, add date and file name to paper materials to make it easier to organize
I can't remember the materials with only the graphs and table printed, what kind of conference distribution materials ...
Excel is very convenient because the data is not only compiled in graphs and tables, but also printed as it is and can be distributed for conferences.
However, when I tried to organize the materials after a while after the meeting, I saw materials that were only printed on graphs and representations, and I had no trouble, "What had been distributed at what kind of meeting?" Is not it.
If information such as the distribution date and time and creator is printed on the distribution material, it will be useful when organizing later, and you will get the impression that it is kind.This time, when printing materials created in Excel, we will explain the technique of setting the information such as the file name, date, and creator.
Display the information you want to print on the header or footer
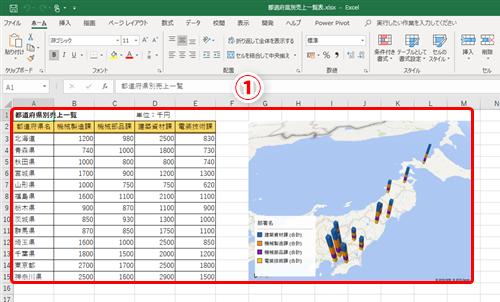
When printing the table and graph (①) of the "prefectural sales list" created in Excel, let's set the information such as the file name and distribution date to print the margin on the top and bottom of the paper.If you want to print information such as date on the upper and lower margins of the paper, display the information you want to print on the "header" or "footer".In this example, the file name is displayed on the header, and the footer name and the number of pages distributed and the number of pages are displayed on the footer.
Click the File tab to display the [Information] screen.Click [Print] (②) in the menu on the left side of the screen, and click [Page Set] (③) displayed at the bottom of the screen.
The Page Settings dialog box is displayed.Click the [Header/Footer] tab (④), and click the downward arrow (⑤) displayed on the right side of the [Header] column to select the file name (⑥) from the menu displayed.Here, the name of the work book is displayed.In this example, "List of sales by prefecture.XLSX is displayed.
Next, select the contents of the footer.Click the downward arrow (⑦) displayed on the right side of the [Futter] column, and click the creator and the date / number of pages (⑧) from the displayed menu.Here, "Creator: TopStudio 2019/4/17, 1 page" is displayed, but the display varies depending on the creator name and the date on which it is operated.
You can not only select headers and footers from the menu, but also edit the selected ones or enter your own contents.Let's edit the contents of the footer selected earlier.Click [Edit Footter] (⑨) between [Header] column and Footter column.
The Futter dialog box is displayed.As you can see from the dialog box, the footer is divided into three parts, the left, the center, and the right side (the same is the same).The footer called "Creator: Topstudio 2019/4/9, 1 page" selected from the menu mentioned earlier can be found to be displayed automatically to the center and right side.
ここでは、作成者名を会社名から個人名に修正してみましょう。「topstudio」を削除して「山田知美」(⑩)と修正し、[OK](⑪)をクリックします。このダイアログボックに表示されている「&[日付]」や「&[ページ番号]ページ」という表示が気になるかもしれませんが、これは印刷時に常にその日の日付や資料のページ番号が印刷されるようにするための決まった書式なので、修正する必要はありません。
After confirming that the [Futter] dialog box is closed and the name of the creator displayed in the [Futter] field in the [Page] dialog box has been corrected to "Tomomi Yamada" (⑫), [OK] (⑬)Click.
All dialog boxes are closed, and headers (⑭) and footer (⑮) are displayed in the print preview on the right side of the screen.
Make a difference to your colleagues with the date and file name on the distribution material!
This time, when printing Excel files, we explained the technique of printing information such as date and file name on headers and footers.
In this example, the date, creator, page number, and file name to be distributed are displayed, but it is also good to set so that the meeting name, project name, etc. are printed.
By all means, please refer to the contents of this article and make a higher -grade distribution material with attentive to viewers!
When switching Windows 7 machines.New PCs increase Excel work efficiency!
The end of the support of Windows 7 is approaching.If you want to buy a new one, buy a PC for work efficiency!Check the specifications of personal computers that make work using Excel and PowerPoint at once!
