Turn your iPhone/iPad into a Mac peripheral! 3 Linkage Techniques You'll Lose If You Don't Know
In communication such as e-mail, there are often cases where "pictures and photos are quicker than explaining in text". For example, when there is a problem with a delivery from a business partner, rather than explaining the condition of the delivery at length, it is often easier to understand by writing a comment on the photograph and sending it. “However, it is troublesome to read each photo into a computer or print it out and write it down with a felt-tip pen.” For those of you who are like that, let's introduce three techniques for linking Macs and iPhones/iPads that enable easy and speedy information transmission.
One of the appeals of Apple products is the speedy collaboration that allows you to write comments directly on a PDF file on your Mac with your iPad. The second linking technique is "Linking Sketch". With this linking technique, you can draw diagrams and illustrations by hand using your iPhone or iPad and insert them into emails, etc. It is useful in various situations such as writing a handwritten map to convey a place, pointing out an electronic device or body part, or showing a flow chart of a work flow.For example, when you want to guide a place by email, a handwritten map is recommended for conveying complicated directions. Rather than explaining "the side button and the volume up button", I think it's easier to explain with a picture. /Prepare an iPad and turn on Wi-Fi and Bluetooth on both. Mac must be macOS Catalina (10.15), iPhone must be iOS 13, and iPad must be iPad OS 13 or later.Once you are ready, the operation is easy. If you select "Insert from iPhone or iPad" in the "File" menu while composing a new email, devices that can use Continuity Sketch will be displayed. Select "Add Sketch" under the name of the device you want to use. In addition to calling from the "File" menu, it can also be called from the context menu ("control" key + click or secondary click).
If you have multiple devices logged in with the same Apple ID, the items will be sorted by deviceWhen you do, the iPhone or iPad screen will switch. You can use your iPhone/iPad without unlocking it, so you don't have to worry about "shifting the mask and having Face ID recognize it...". Pens and markers are lined up at the bottom of the screen, so choose your favorite tool and draw illustrations and diagrams by hand. It's pretty comfortable with an iPad and Apple Pencil, but you can also use it with your fingers. Once you get used to it, you'll be able to write quite finely with just your iPhone and your finger.
When you have finished writing, tap the "Done" button at the top right of the iPhone/iPad screen. The diagram you drew instantly will be inserted as an image in the email, so all you have to do is send it. It's much faster than scanning or taking a picture of what you wrote on paper and importing it into your Mac. This is a technique you should master if you want to send a diagram to someone.
The iPad switches to the drawing screen, and you can write using various tools such as felt-tip pens, erasers, and markers. You can freely choose the color. The sketch will not be exported in the iPhone/iPad screen size, but will be a cropped image of the area you wrote.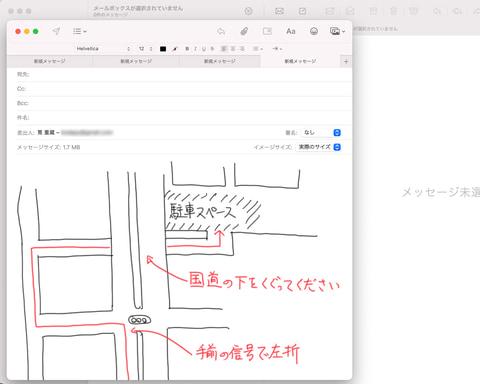
In addition, this linked sketch function can be used with various software other than email. It can also be used with document creation software, so if you are good at drawing, you can use it to include handwritten illustrations in your presentation. The main software that can use the function is as follows.
"Link markup" for easy writing to PDF
The second linking technique is "link markup". This is a linking technique that allows you to add handwritten drawings and characters to image files and PDF files on your Mac using your iPhone/iPad. As with Continuity Sketch, log in with the same Apple ID and turn on Wi-Fi and Bluetooth. The OS conditions are the same as those for Link Sketch.
First, if you select an image file or PDF in the Mac Finder and press the space key, the image will be previewed using the macOS standard "Quick Look" function. At this time, if you press the "Markup" button at the top of the window, several markup tools will be displayed at the top of the window.
Next, press the "Annotate on iOS device" button on the right side of the tool group. A list of devices that can be linked is displayed, so if you select the device you want to use, images and PDFs will be instantly displayed on the screen of that device. Drawing tools such as a pen will be displayed at the bottom of the screen, just like in the previous link sketch, so feel free to write.
In Quick Look, the top of the window has a button shaped like the tip of a pencil. This is the "Markup" button. Let's click The tools for markup are lined up at the top of the window. Next, press the "Annotate on iOS device" button on the right end of this tool group and select the device you want to link.The tools displayed on iPhone/iPad are the same as Link Sketch. You can also draw straight lines using a ruler tool, etc.With Link Markup, you can check what you have written on your iPhone/iPad almost in real time on your Mac. If you press the "Done" button on the Mac side, the written contents will be reflected.
With this function, you can write annotations very quickly without having to transfer the file to your iPhone/iPad or transfer it back to your Mac after writing. However, be aware that the moment you press "Finish", the contents of the file will be updated and cannot be restored unless you restore from backup.
"Continuity Camera" that allows you to import photos immediately
And the third is "Continuity Camera". This is a linking technique that allows you to call up the iPhone/iPad camera from the Mac side and immediately capture the shot. This can be used on macOS Mojave (10.14), iOS 12 or later.
The operation is performed from "Insert from iPhone or iPad" in the "File" menu in the same way as with Link Sketch. If you follow the hierarchy of the menu, there is an item called "Take a picture", so let's select it. Then, the iPhone/iPad camera app will start up. If you tap "Use photo" after shooting, the photo will be inserted into the software on the Mac side.
Select the device you want to use from the menu, and then select the "Take a Photo" item. Shoot with your iPhone/iPad. Unlike regular camera apps, you can't select portrait mode or video shooting. Tap "Use Photo" on your iPhone/iPad to insert the image on your Mac. From this state, it is also possible to write diagrams using the markup functionIn addition to the software mentioned in the Linked Sketch section, the "Preview" application can also be used. With the Preview app, you can instantly save what you shoot on your iPhone or iPad to your Mac. I think that it is a linking technique that can be used in a wide range of situations, such as creating emails, inserting images in various document creation software, and saving directly to files.
In addition, the "Insert from iPhone or iPad" menu also has an item "Scan Documents". This is also one of the features of Continuity Camera. If you take a picture of a paper document, it will adjust the perspective, tilt, contrast, etc. You can use your iPhone/iPad as a simple scanner.
In "Scan Document" mode, the shutter is automatically pressed when the document is recognized. If you shoot multiple documents continuously, a multi-page PDF file will be created. When you finish shooting and press the "Done" button on your iPhone/iPad, the scanned document will be inserted on the Mac sideproperty Let's make use of it
These three linking techniques are similar to using an iPhone/iPad as a Mac peripheral. In this case, the iPhone/iPad is just an input device, and sketches and photos taken are not saved on the iPhone/iPad. Even if you try to find it later, it is impossible to find it from your iPhone/iPad, so let's understand that point.
In addition, it is recommended that these linking techniques be used only for temporary communication or as a memo for yourself, rather than using them to write and store full-fledged illustrations and diagrams. is. Let's use it while understanding the characteristics of the function, and try to improve the ability to transmit information and improve work efficiency.
